Chemical Storage Guidelines for Research Laboratories
Master chemical storage guidelines for research labs. Covers temperature ranges, container choices, hazard segregation, labeling, and compliance best practices.
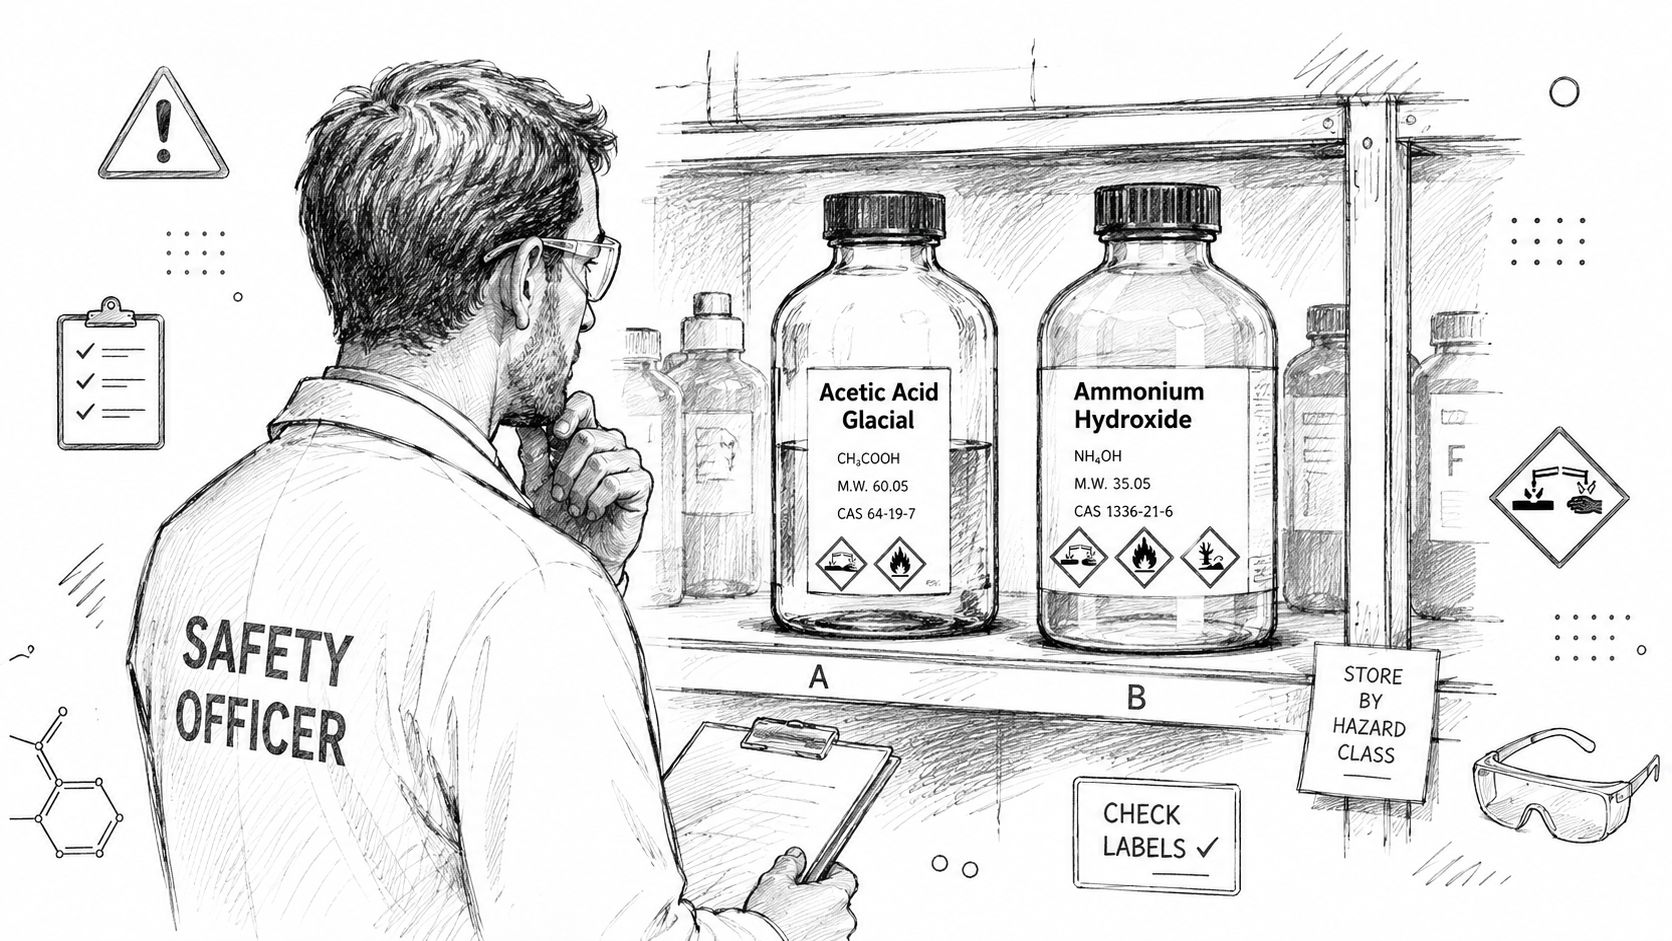
The inspection never starts with a clipboard. It starts with a shelf. A safety officer sees the bottle that's on the wrong bay, the incompatible pair that's been sitting too close for months, and the freezer drawer that looks organized until the labels are checked. That's where chemical storage guidelines stop being policy language and start becoming the difference between a clean audit and a corrective-action log.
Modern labs don't store a single chemical family anymore. They hold bulk solvents, corrosives, oxidizers, biologics, and milligram-scale research materials that all ask for different controls. The practical problem isn't that people never learned the rules, it's that the rules get blurred into “store it safely” until nobody can tell what safe means at bench level.
The strongest storage programs turn vague policy into measurable limits, separation distances, and documented accountability. That means gallon caps, containment percentages, cabinet types, temperature logs, and label discipline that someone else can verify without guessing. Those are the controls that hold up across academic labs, industrial R&D sites, and warehouse-scale inventories.
Why Chemical Storage Guidelines Matter in Modern Labs
A shelf audit can fail on one detail. A bottle stored above eye level, a corrosive parked beside a flammable, or a freezer drawer with no legible date can turn an otherwise orderly room into a citation risk.
The same pattern shows up again and again. Alphabetical shelving makes containers look organized, but it does nothing to keep acids away from bases or oxidizers away from solvents. Cold storage creates its own failures when researchers treat a freezer like a holding area for unstable or unlabeled material.
A reviewer should be able to answer three questions at a glance. What is the hazard class, where does it belong, and what rule keeps it there? If those answers take a guessing session, the storage system is not ready for audit.
Inventory mix makes that harder, not easier. One lab may hold volatile solvents on an open shelf, corrosives in a separate cabinet, and research peptides or coenzymes in a freezer drawer beside peroxide formers. That mix only stays manageable when the storage plan is written for daily bench work, turnover, and rushed cleanup, not for perfect memory.
chemical storage guidelines matter because they turn storage into something a manager or safety officer can verify without arguing about intent. They set the thresholds that separate a tidy shelf from a defensible one, including cabinet placement, separation, and documentation that another person can check. That practical standard keeps bench habits from drifting until the next inspection exposes the gap.
Regulatory Framework and Hazard Class Limits
A shelf can look orderly and still fail an inspection if the limits are wrong. Chemical storage starts with measurable thresholds that a safety officer can check on the spot, especially for flammables. OSHA-based guidance commonly caps storage outside approved cabinets at 25 gallons for Category 1 flammables and 120 gallons for Categories 2 to 4, while an approved flammable-storage cabinet may hold up to 60 gallons of Category 1 to 3 liquids or 120 gallons of Category 4 liquids. Those limits are the difference between a room that only looks controlled and one that can be defended during an audit. OSHA-based storage limits
The international framework matters for the same reason. The Globally Harmonized System, GHS, adopted by the United Nations, standardizes hazard communication across borders, and the current revision in UNECE materials is Rev. 10. Its label and safety data sheet requirements include conditions for safe storage, including any incompatibilities, which is how a vendor's language becomes usable at the bench. UNECE GHS Rev. 10
How regulators and lab programs split responsibility
Federal standards, consensus codes, and institutional rules serve different functions. OSHA provides the enforceable baseline. NFPA and local fire marshals often shape how that baseline is applied in the building, while Environmental Health and Safety offices add controls based on local risk, room design, and the lab's history.
The error I see most often is treating a small bottle count as a free pass. Small quantities still have to respect compatibility, cabinet limits, and separation from ignition sources or reactive neighbors. A room can be “low volume” and still be out of compliance if the hazard class is wrong for the storage location.
The practical test is simple. Identify the hazard class first, then apply the cabinet or control-area limit, because the order determines whether the storage plan holds up under review. If the label, quantity, and location do not match, the shelf is already in failure territory.
| Key Regulatory Storage Thresholds | |||
|---|---|---|---|
| Regulation / Standard | Hazard Class | Threshold Limit | Required Action |
| OSHA-based flammable guidance | Category 1 flammables | 25 gallons outside approved cabinets | Move excess into an approved flammable-storage cabinet |
| OSHA-based flammable guidance | Categories 2 to 4 flammables | 120 gallons outside approved cabinets | Keep within controlled storage limits |
| Approved flammable-storage cabinet | Category 1 to 3 liquids | 60 gallons per cabinet | Use cabinet storage instead of open shelving |
| Approved flammable-storage cabinet | Category 4 liquids | 120 gallons per cabinet | Store only in approved cabinet conditions |
The rule that holds everything together is straightforward. Hazard class and quantity decide the storage path, and the label has to support that decision. Once those pieces match, the shelf becomes a controlled system instead of a guess.
Segregation by Compatibility Rather Than Alphabet
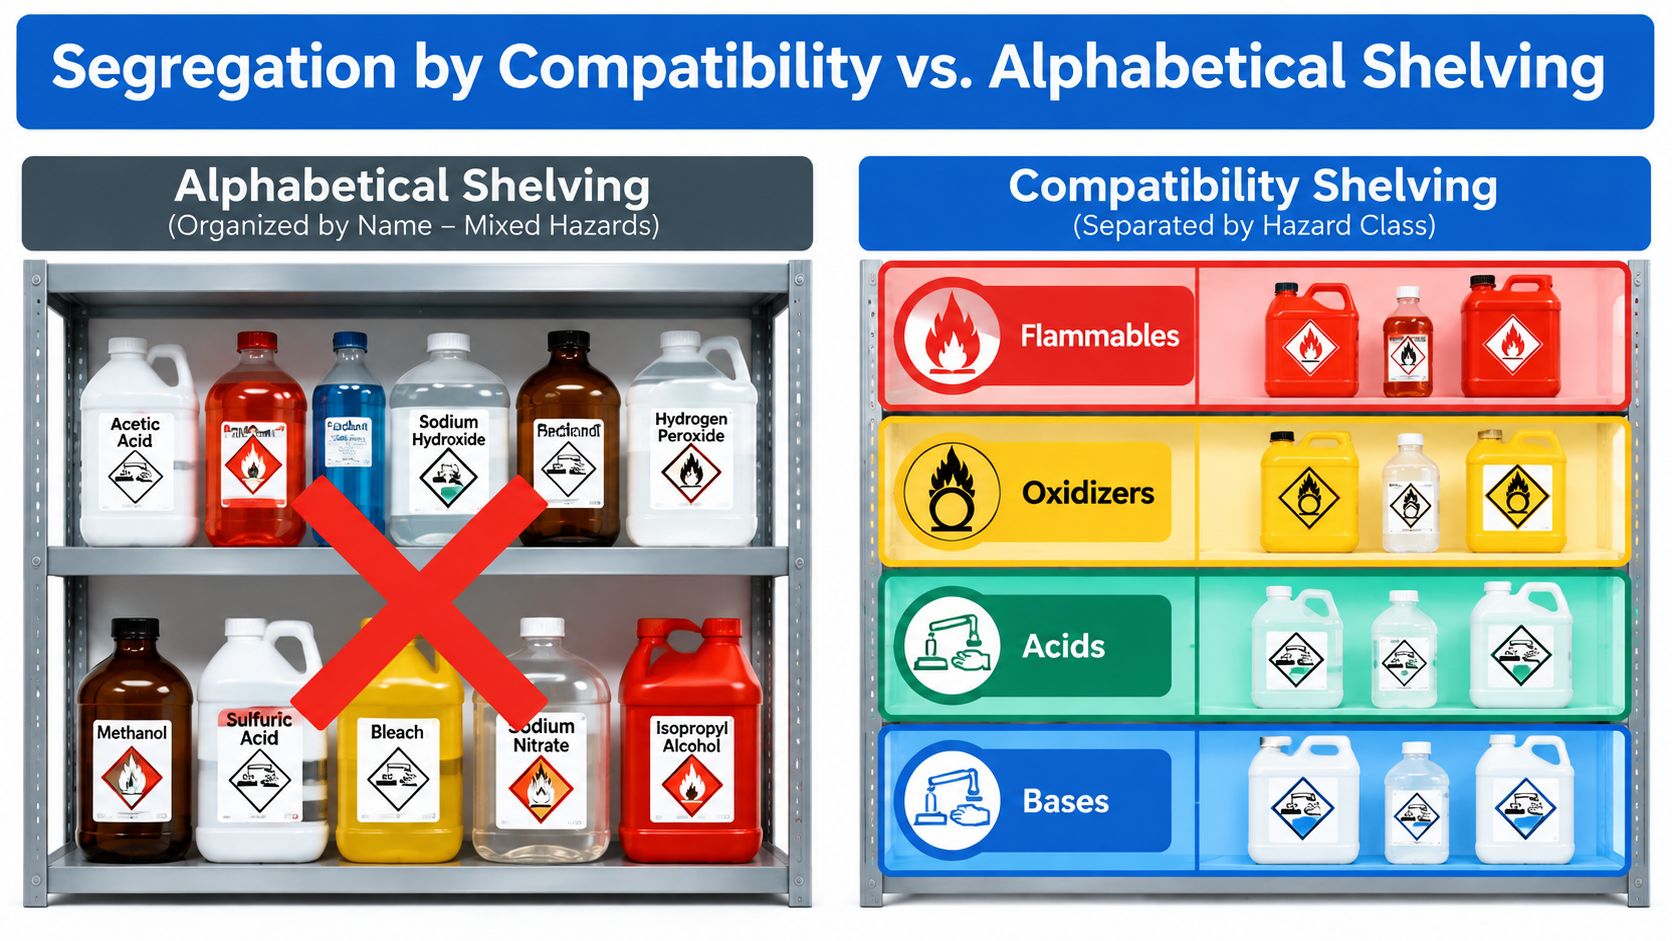
Alphabetical storage looks orderly until the shelf is tested by chemistry. A neat row of bottles can still hide a dangerous mix if the labels are sorted by name instead of compatibility. That's why lab guidance consistently says to store by hazard class and compatibility, not by alphabet. NIH Chemical Hygiene Plan guidance
Build the shelf around incompatibility zones
Start with the groups that must stay apart. Acids and bases need separate locations, oxidizers stay away from flammables and reducing agents, and flammables belong in approved cabinets rather than on open shelving. Incompatible materials should be separated by a physical barrier or by meaningful distance, with open shelving reserved only for compatible neighbors. University and government segregation guidance
The common failure is not ignorance of the hazard. It's grouping all the “A” chemicals together, then discovering that acetic acid is parked beside a base, or that an oxidizer shares space with solvent stock. That layout turns a storage shelf into a reaction setup waiting for one spill, one broken cap, or one bad transfer.
Practical rule: alphabetizing is only acceptable inside a hazard family, never across families.
Retrofit the shelf without rebuilding the lab
A full overhaul isn't always necessary. Color-coded hazard family labels, rigid dividers, and clear cabinet assignments usually solve the worst problems fast. The shelf needs to tell staff where a bottle goes before they read the fine print, not after.
The bench-level habits matter too. Keep incompatible groups separated, keep open shelves from becoming a catch-all, and keep every container in a place that matches its hazard class. That is what makes chemical storage guidelines workable under pressure, not just on paper.
A quick visual check can prevent a long cleanup. The point is not to make shelves look pretty, it's to make the next person's decision obvious.
Temperature and Environmental Controls
Temperature control fails, then all at once. A vial looks fine until a weekend compressor issue, a light-exposed bottle, or a humid shelf turns a stable sample into a disposal candidate. Stored chemicals should not be exposed to heat or direct sunlight, and thermally unstable materials should go in a refrigerator; peroxide-forming materials belong at the lowest possible temperature consistent with solubility or freezing point. NIH Prudent Practices in the Laboratory
Match the storage zone to the material
Ambient storage is not a default guarantee. Materials that need refrigeration or freezing should live in units that hold that condition, not in a domestic fridge that was repurposed because space ran out. Flammables need lab-safe or explosion-proof equipment when the storage environment creates ignition risk, and the unit has to fit the hazard instead of pretending all cold storage is equal.
Humidity matters too. Hygroscopic materials need dry conditions, and photoreactive compounds need amber glass or foil-wrapped protection from light. If a material clumps, discolors, or dries unevenly, the storage environment is telling on the process.
Monitoring has to catch failures before Monday morning
Manual checks are not enough for equipment that fails after hours. Continuous digital monitoring with alerts for deviation is the practical standard because it gives staff a chance to respond before the whole inventory shifts out of spec. Twice-daily checks may catch a problem during business hours, but they don't reliably catch the compressor failure that starts Friday night.
A sensible environmental program also includes stable placement, door discipline, and clear separation of materials that have different needs. That includes keeping sensitive compounds out of heat, away from direct light, and in the correct cold zone for their stability profile.
| Temperature and Environmental Storage Requirements by Compound Class | |||
|---|---|---|---|
| Compound Class | Temperature Range | Humidity Limit | Special Requirements |
| Ambient-stable reagents | Room temperature | Keep dry | Store away from heat and direct sunlight |
| Refrigerated materials | Refrigerated conditions | Keep dry | Use dedicated laboratory refrigeration |
| Frozen materials | Frozen conditions | Keep dry | Minimize door openings and thaw events |
| Light-sensitive compounds | As specified by the material | Keep dry | Use amber glass or foil wrapping |
The safest systems are boring. They hold the right temperature, warn early, and keep the sample from being bounced between conditions that shorten usable life.
Container Selection and Secondary Containment
The container is part of the control system. A bottle that reacts with its contents turns good storage into a slow failure, and the wrong tray size turns a minor leak into a roomwide cleanup. Cornell EHS specifies containment capacity of at least 110% of the primary container volume or the largest single container in a tray, which makes containment a measurable requirement instead of a vague preference. Cornell EHS laboratory safety manual
Match the material to the chemistry
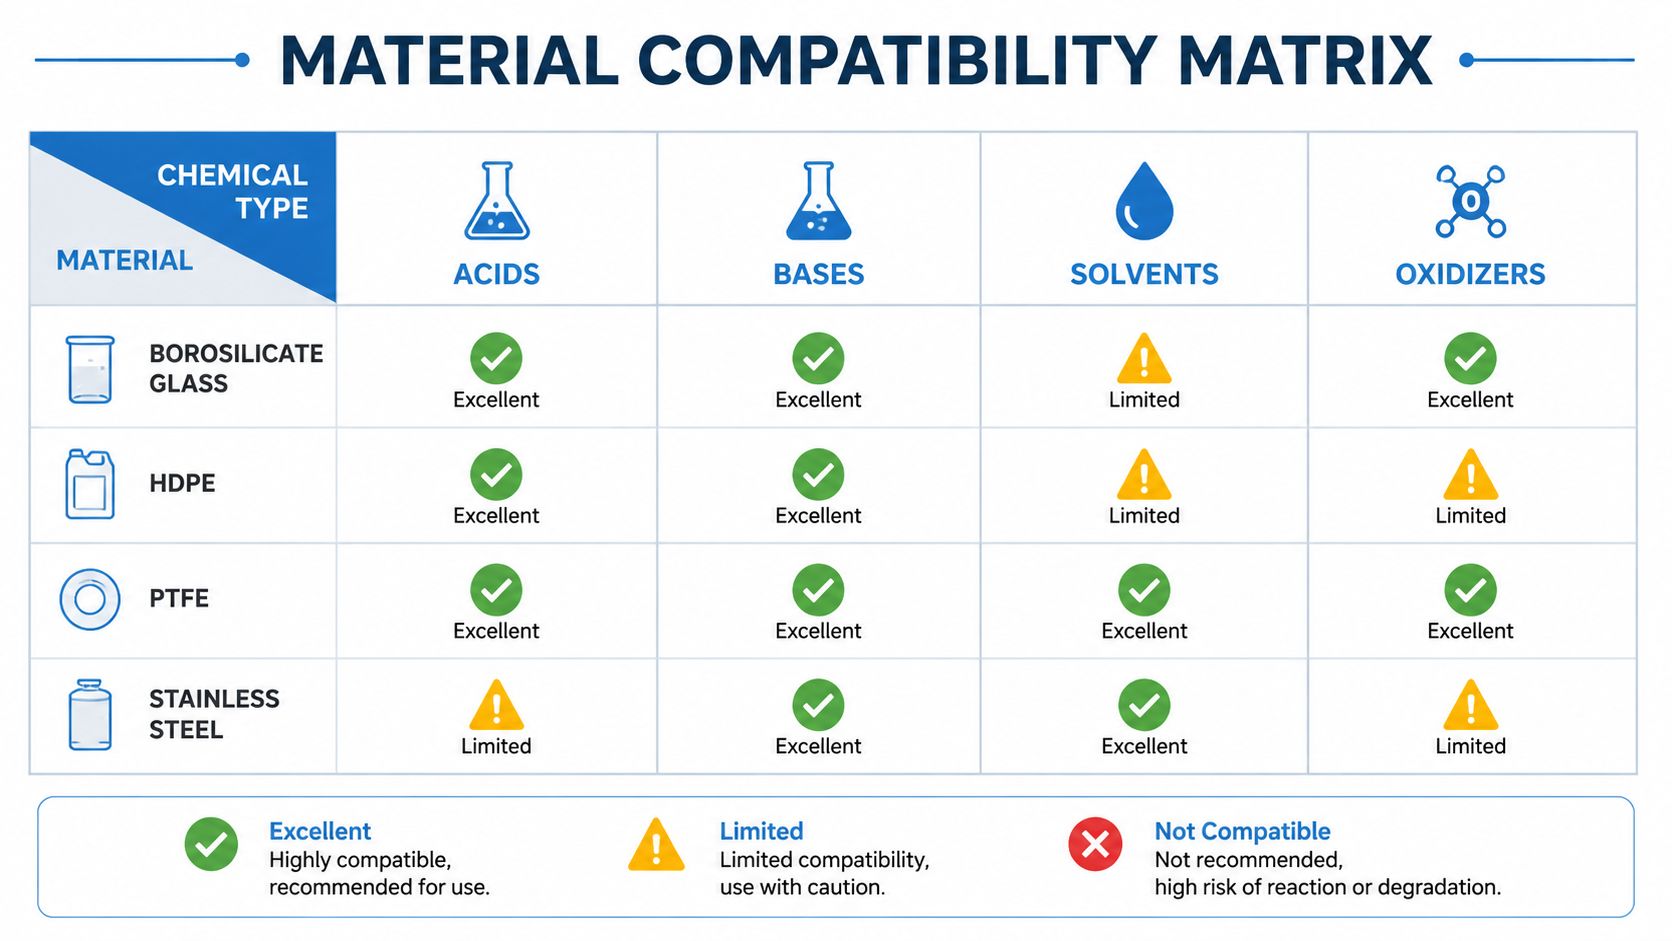
Borosilicate glass works for many routine reagents, but it is not universal. HDPE and PTFE are better choices when compatibility with certain corrosives matters, and stainless steel belongs where the chemical profile and handling conditions support it. Hydrofluoric acid is the classic example that pushes teams toward polyethylene, while strong bases can degrade glass over time and create etching that eventually leads to failure.
Shelving has to support the container, the secondary tray, and the human habit of adding one more bottle than planned. Sturdy shelves with lips, wall anchoring where needed, and a load rating suited to chemical inventory all reduce the chance of accidental release. Wooden shelving for corrosives and oxidizers is a poor choice because it absorbs residues and adds combustion risk.
Practical rule: if a tray or shelf can't retain the leak, the containment plan is incomplete.
Use containment that fits real spill behavior
Benchtop bottles need trays that are large enough to do the job, not decorative mats that catch drips and nothing else. Drum areas need spill pallets with sump capacity sized for the scale of the inventory, because a large container changes the spill geometry immediately.
The best container system is the one that makes a leak predictable. That's what turns chemical storage guidelines into something a team can inspect, maintain, and defend during an audit.
Labeling Standards and Documentation Practices
A label is not decoration, and it is not optional once a bottle leaves the supplier's original packaging. Under GHS labeling, a container needs a product identifier, signal word, hazard statements, precautionary statements, and supplier information. In the lab, that label also has to survive transfers, cold storage, and solvent wipes without turning into unreadable tape residue. OSHA's 29 CFR 1910.1200(f) sets the baseline for workplace labels, and institutional policy should tighten it further where secondary containers and shared storage are involved.
Turn every container into a traceable asset
Institutional labels fill the gaps that supplier labels do not cover. Receipt date, opening date, expiration date, and the initials of the responsible researcher show how old the material is and who last controlled it. For secondary containers, the minimum is the chemical name, concentration, date prepared, and preparer initials. If a container leaves a bench without those elements, it is already hard to audit.
Research compounds need a tighter chain of custody. Certificates of Analysis should be tied to inventory records with lot numbers, purity data, and storage-condition specifications. That linkage matters when a lab is reproducing a result, comparing batches, or quarantining a suspect lot. COAs should be retained with the inventory record for as long as institutional policy requires, and the file should be easy to match to the physical container without guesswork.
Fix the label failures that show up in inspections
The same mistakes show up again and again. Thermal labels on cryovials fade. Handwritten stickers on secondary containers leave out hazard pictograms. Transferred solutions sit in unlabeled beakers overnight because somebody expected to remember what they were.
A label that cannot be read after one cold cycle or one solvent wipe is a liability.
High-throughput labs often need barcode or RFID systems to keep pace with compound volume. That does not replace human checks, but it does make lot tracking, expiration alerts, and audit trails easier to maintain when inventory gets large. The practical test is simple, an auditor should be able to identify the material, trace its origin, and confirm its current status without chasing three different notebooks.
A clear label turns a storage site into a managed system. Without it, the shelf may look organized, but nobody can prove what is there, how long it has been there, or whether it still belongs there.
Inventory Management and Expiration Tracking
Inventory control fails when a lab treats every retained bottle as a future rescue. The smarter approach is to keep the smallest feasible quantity, retain only what supports real work, and remove materials that no longer justify the risk. University guidance increasingly frames storage around compatibility, minimal quantity, and date tracking because forgotten material becomes a compliance problem long before it becomes useful again. UNL chemical lab storage guidance
Decide what stays and what goes
Partially used compounds are worth keeping only when the next assay or workflow is expected. If a material has no planned use, no clear expiration path, or no reliable stability record, it has already shifted from convenience to liability. That judgment matters more for materials that degrade, absorb moisture, or form dangerous byproducts.
Documenting receipt or opening dates helps the team separate fresh stock from aging stock. First-in, first-out rotation keeps older material moving, and quarterly inventory audits catch the items that would otherwise disappear into the back row.
Know the disposal triggers
The retention decision gets simpler when the material shows a visible change. Clumping, discoloration, and broken seals are warning signs that the container is no longer an active asset. Peroxide-forming solvents are a special case, because opened material that sits too long becomes a disposal issue rather than a convenience.
| Chemical Retention and Disposal Thresholds | |||
|---|---|---|---|
| Chemical Category | Max Retention (Unopened) | Max Retention (Opened) | Disposal Triggers |
| Peroxide-forming solvents | Follow supplier and institutional policy | Opened material should be reviewed on a defined schedule | Visible crystallization, age, or peroxide concern |
| Hygroscopic reagents | Follow supplier and institutional policy | Review after opening and during audits | Clumping, color change, or moisture uptake |
| General research stocks | Store only what supports projected work | Keep minimal quantities on hand | No planned use or uncertain identity |
Barcode-based systems help, but manual logbooks still work when they are kept current. Failure is not the format, it's the habit of letting the inventory drift until nobody knows what's valid anymore.
Storage Protocols for Research Peptides and Coenzymes
Research peptides and coenzymes punish casual handling faster than many standard reagents do. They are sensitive to temperature swings, moisture, light, and repeated thawing, which means storage needs to be planned around preservation, not convenience. Pro Tec Pep supplies batch-verified materials with batch-linked documentation, so the inventory record can stay tied to the exact lot being managed.
Cold-chain discipline matters
Lyophilized peptides are commonly kept at -20°C, while -80°C is preferred for long-term stability beyond 12 months. Repeated freeze-thaw cycles shorten usable life, so aliquoting into single-use portions at receipt or during initial reconstitution is the cleanest way to reduce damage. For hygroscopic peptide powders, desiccation with silica gel indicators and humidity below 30% RH helps protect material integrity.
Coenzymes such as NAD+ need the same kind of discipline, because light and temperature drift can change how long a preparation remains useful. Buffer choice, pH, and container protection matter during sample prep, especially when the same stock has to support repeated analytical runs.
Reconstitution belongs to sample prep, not improvisation
Sterile water and buffer choices should match the documented stability of the material and the intended analytical workflow. Once a material is reconstituted, the clock starts, and post-reconstitution stability windows vary widely by compound and storage temperature. The safest practice is to document the exact prep conditions, then use that record to decide whether a vial still belongs in active inventory.
The point isn't to overcomplicate handling. It's to keep sensitive molecules from being damaged by shortcuts that look harmless at the bench and costly later in the data.
Institutional Compliance and Audit Readiness
A storage program only matters if it holds up under inspection. Environmental Health and Safety teams usually look for the same evidence, current inventories, accessible Safety Data Sheets, containment checks, and temperature-monitoring records that show the lab maintained control. The NIH chemical segregation and storage guidance sets the baseline many programs are expected to meet.
What auditors expect to see
The paper trail should connect what was purchased, where it was stored, and how it was controlled. Inventory lists need to match the shelves, refrigerator logs should show stable conditions, and secondary containment records should show trays or pallets were in place. Procurement staff often get involved too, especially when a purchase crosses a threshold quantity or requires storage-space verification before ordering.
The failures are usually plain to see. An unlabeled secondary container. An expired peroxide former. Incompatible chemicals sharing a shelf because cabinet space ran short. Each problem is easy to spot once the audit starts, and easier to correct before the inspection notice arrives.
Keep readiness continuous
Weekly self-inspections beat scramble-preparing before a scheduled visit. Digital documentation systems help because they keep labels, lot records, and monitoring logs in one place, cutting the time wasted hunting through binders and desktop folders. Continuous readiness comes down to daily habits, not last-minute preparation.
Practical rule: if the corrective action depends on someone remembering where a file lives, the system is too fragile.
Strong labs treat audit readiness as part of routine operations. That keeps storage from drifting, and it keeps chemical storage guidelines from becoming a once-a-year cleanup project.
Quick Reference Guide by Hazard Class
A shelf that looks orderly can still fail an audit if the control point is wrong. Flammables crossing the open-shelf limit belong in an approved cabinet, and many institutional guides treat 10 gallons as the cutoff that changes the storage decision. Once that threshold is crossed, cabinet type, spacing, and inventory control all matter at once.
Flammables
Flammables belong in approved flammable-storage cabinets when quantities rise beyond the open-shelf limit. The common failure is leaving solvent stock on open shelving or in a standard refrigerator that was never built for vapor control. University guidance on chemical storage
Oxidizers, corrosives, and reactives
Oxidizers stay separate from flammables and reducing agents. Corrosives should not sit above eye level, because spills from upper shelves are what usually create the worst exposure path. Reactive materials need temperature and moisture control that matches their instability profile. Storage areas should stay ventilated and held at a consistent, cool temperature, and certain segregated arrangements call for an 8-foot separation or an approved barrier. NIH segregation and storage memo
| Chemical Storage Quick Reference by Hazard Class | ||||
|---|---|---|---|---|
| Hazard Class | Cabinet Type | Max Quantity per Control Area | Separation Rule | Common Mistake |
| Flammables | Approved flammable-storage cabinet | Follow the applicable cabinet and control-area limit | Keep away from ignition sources and incompatible classes | Storing on open shelving |
| Oxidizers | Designated compatible storage | Follow institutional limits | Separate from flammables and reducing agents | Mixing with solvent stock |
| Corrosives | Corrosive-compatible storage | Follow institutional limits | Keep below eye level and apart from bases or acids as appropriate | Storing above reach |
| Reactive compounds | Compatible, controlled storage | Follow material-specific limits | Keep dry, cool, and isolated from incompatible materials | Treating them like ordinary reagents |
| Toxics | Controlled, secured storage | Follow institutional limits | Keep access restricted and labels readable | Leaving them in shared bench space |
Hybrid-hazard compounds need the stricter rule to win. If a material is both flammable and corrosive, the storage decision has to address both hazards, because the easier option is often the one that fails first.
Strong storage programs do not depend on memory, luck, or “everyone knows where it goes.” They hold to the same measurable limits every time, which is why the shelf stays compliant when staffing changes.